KINDERGARTEN
LESSON 20: MAKE A GOOGLE ALPHABET BOOK
LESSON MISSION

|
|
DAY 1:
|
TOOL BOX
TERMS TO KNOW
Google Slides: a digital tool used to make presentations, games, animations, and books
E-Book: a digital book or a book that you can read online icon: a small picture that stands for a digital tool and when clicked on allows you to use the tool drop down menu: a small pizza or triangle shape next to an icon that lets you know there is more to see text box: a box that you can type words into gradient: digital color that looks realistic because it uses shades of color that make the color appear as if a light was shown on the slide Google Drive: your work folder online where all work is saved and how you can share work with others cursor: a flashing line that shows where you will start typing shift key: a key on the computer keyboard that when pushed with the letter makes the letter a capital letter or makes the other symbol on the keys without letters font: the style that your letters will appear when you type |

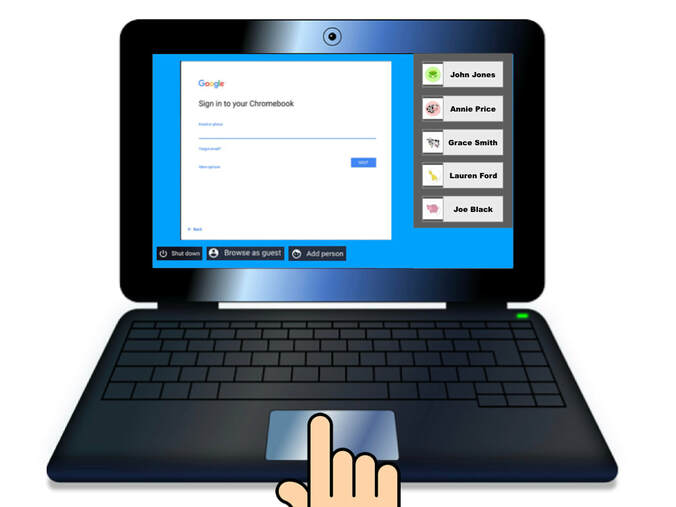
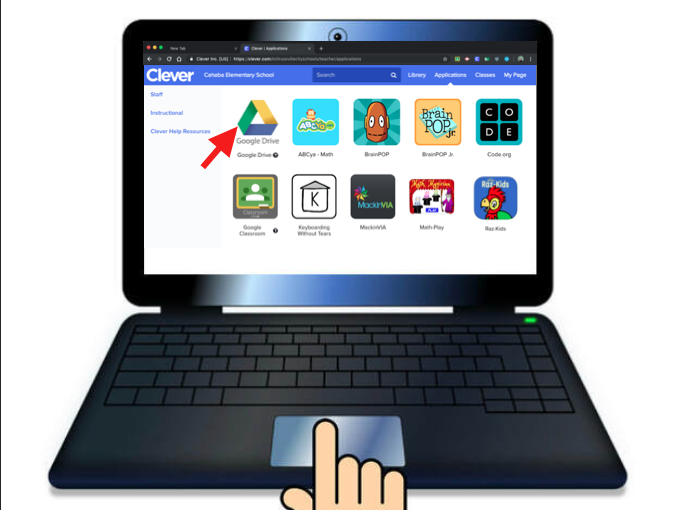
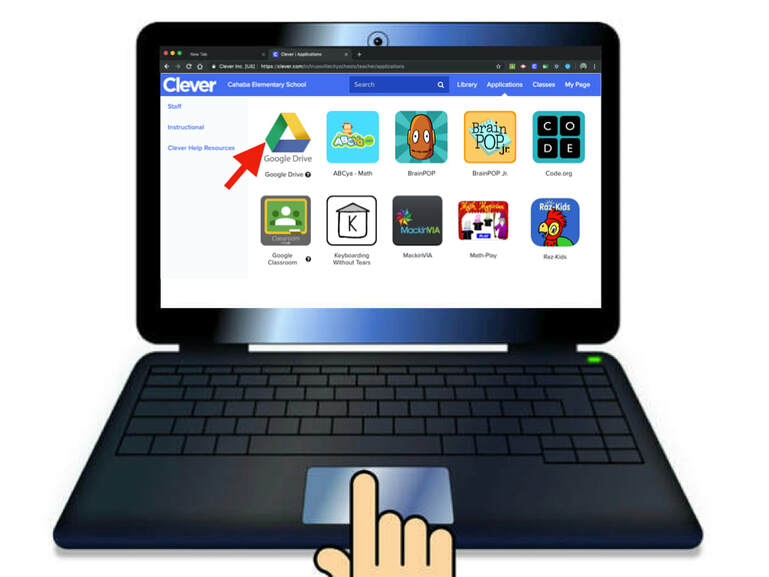
2.) Sign in to your Clever Dashboard.
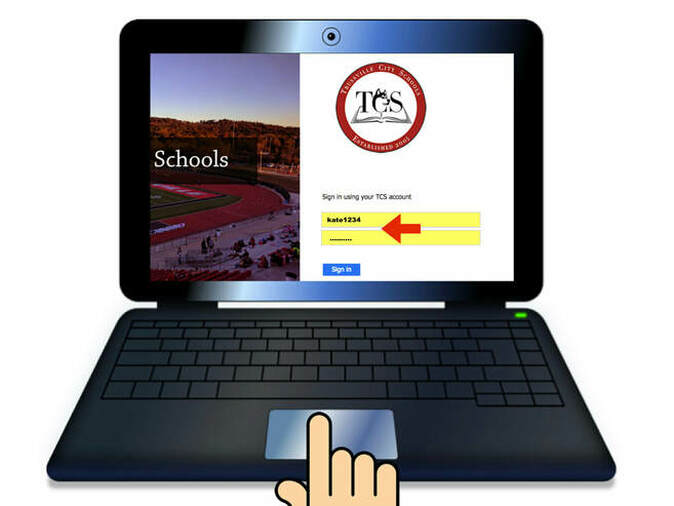
3.) Click on the Google Drive Icon.
4.) Click on the button at the top, left corner that says, "NEW."
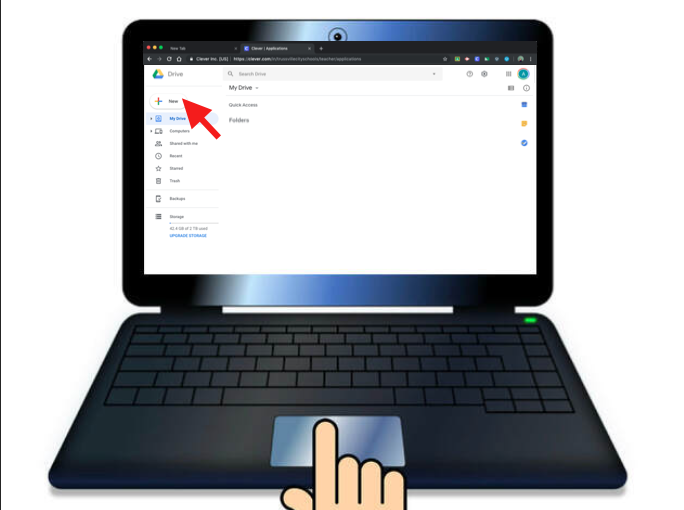
5.) Scroll down to the item with a yellow rectangle. It says, GOOGE SLIDES.

6.) Click on Google Slides to create a new Google Slide.
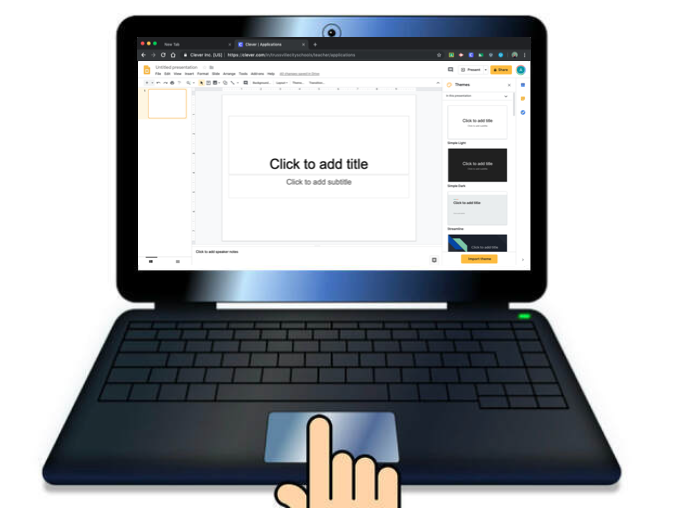
Class E-Book

|
You did it! You created a Google Slide. Now let's learn a little bit more about our project. Each person will get a letter. Using the letter you will create one slide with pictures that begin with that letter. When everyone has completed their slide, we will combine all the slides into one Alphabet E-Book for the Kindergarten classes that come to Cahaba Elementary next year. An E-Book is a book that you can read online. I will also print out your E-Book so that your teacher has a paper copy as well. You are going to play a big part in helping the new kindergarteners learn their alphabet!
|
DAY 2:
All About the Tool Box, the Background, and Saving Work
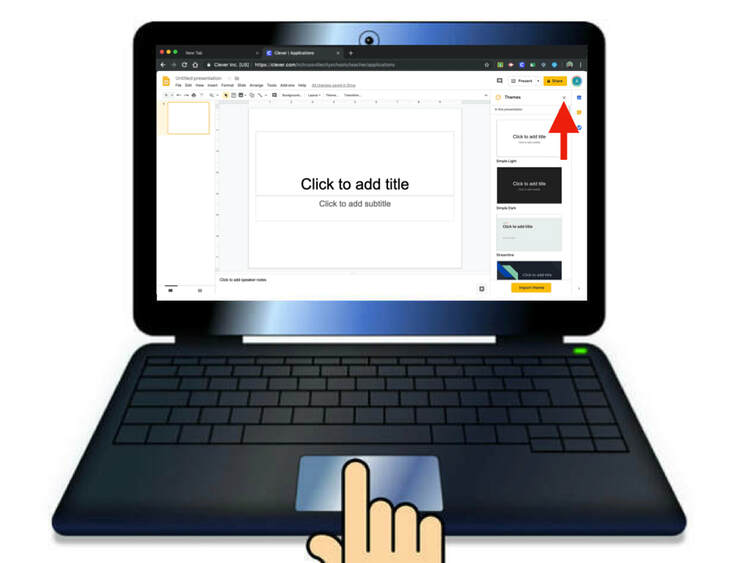
The first thing we will learn is how the toolbox works. In your slide, click on the X under share. This will close out the templates so that you have more room to work.
The little pictures that are circled are your slide tool box. These little pictures are called icons. These icons will allow you to design your slide.

The tool box tools will change if you click on any features in your slide because each feature has its own set of tools. If you have not clicked on a feature, then the tools you see will allow you to add slides and make changes to the slide background only.
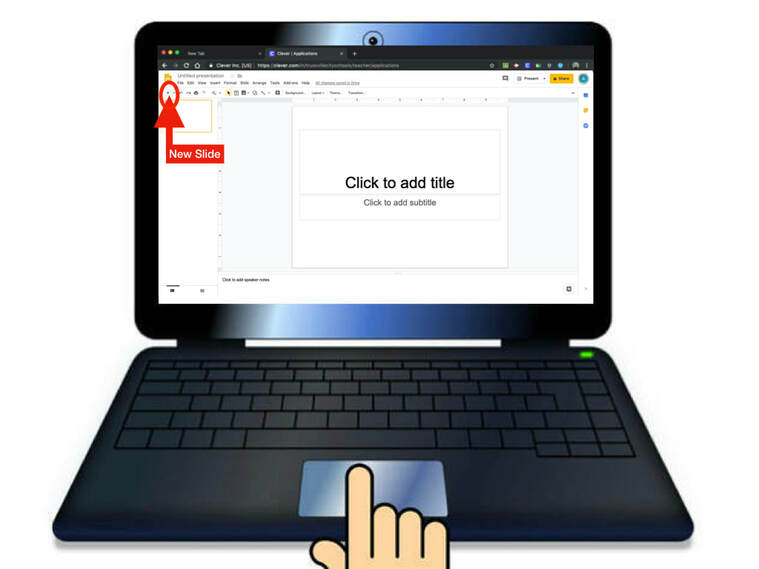
Let's go over the tools that you will be using. You will learn about the other tools as you get older. In this lesson, you will only learn the basics. The + button you see below, allows you to add another slide. Even though you won't be making but one slide, you will learn how to add slides when we put everyone's slides together for the book.
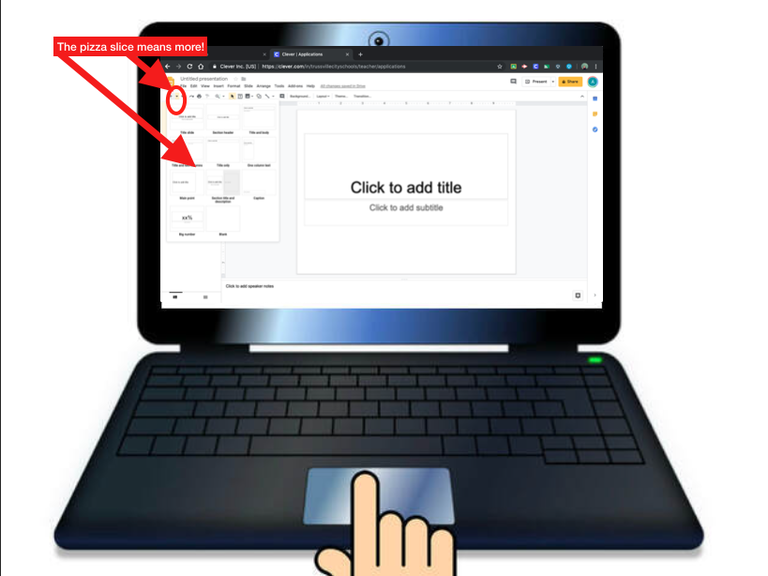
The upside down triangles that look like pizza slices, mean there is more to see. If you click on the pizza icon, you will see more options for that tool. The pizza icon is called a drop down menu.
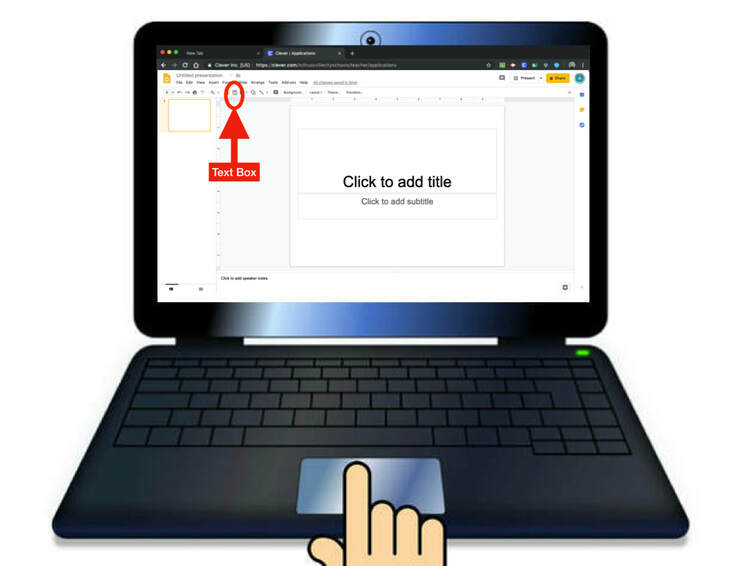
The icon you see below is called a text box. A text box is a box that you can type words into. This template gives your 2 text boxes already set up for you. You will learn how to draw a text box soon, but for now, we will use these. Text boxes always have, "Click to add" until you type into it.
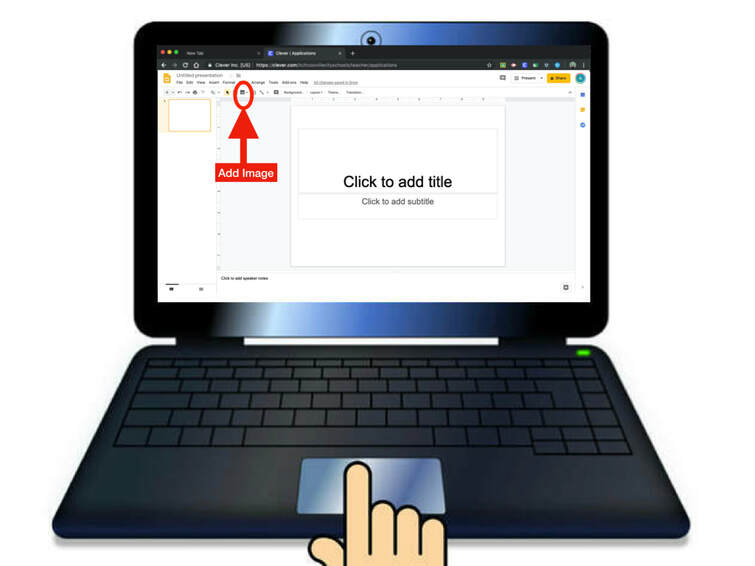
This icon inserts images into the slide. The image icon, is a small square that with two snow tipped mountains.
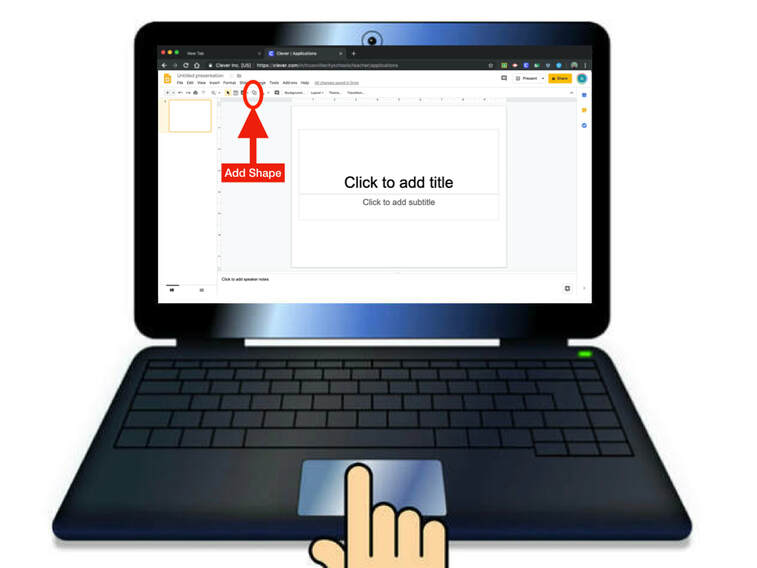
The icon that has a circle and a square together is the shapes icon. With this tool, you can add all different kinds of shapes to your slide.
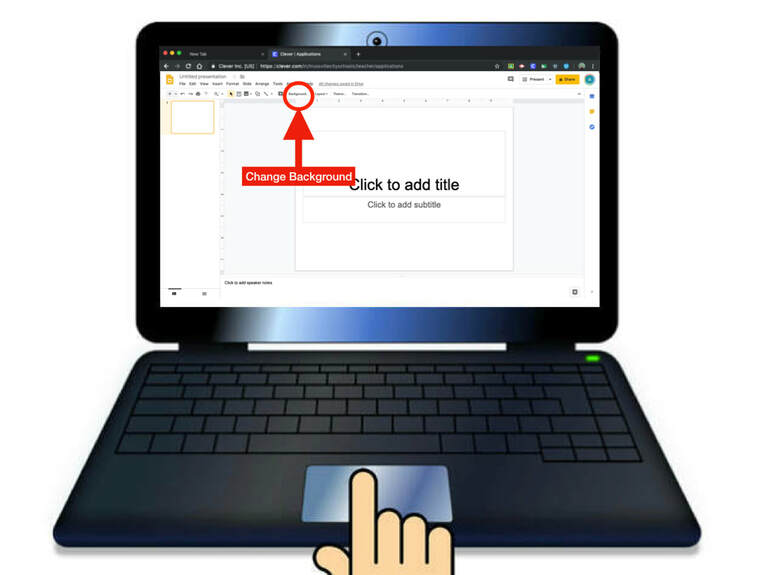
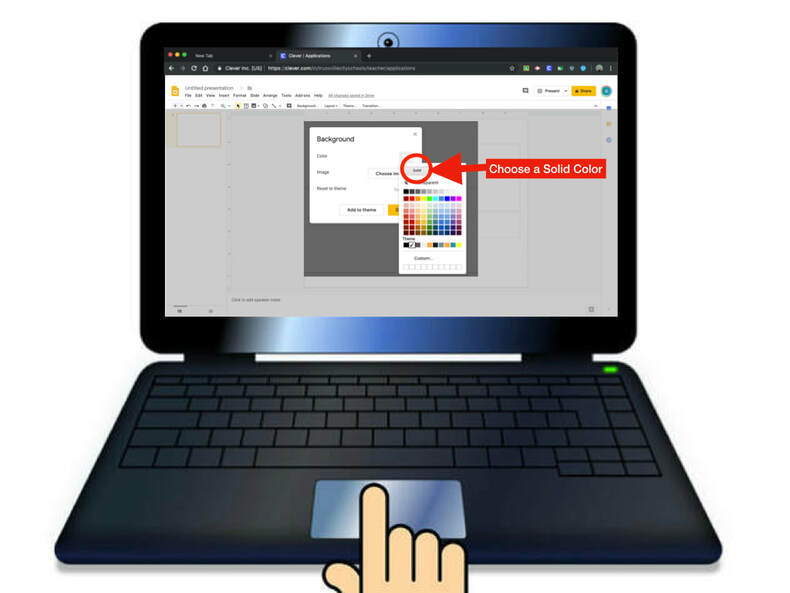
The tool below actually tells you what it does. It is called Background. The Background icon allows you to change the background to a color or image. This will be the first thing we do together. Click on the Background icon on your computer.
This box will pop up on your screen after you click on background. Today, you will learn how to change the background color. There is a circle in the pop up box. Click on the circle.
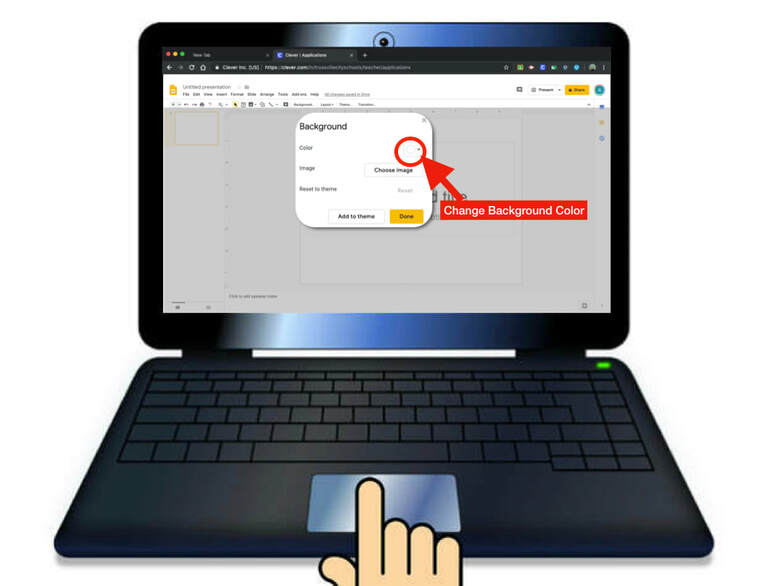
After you click on the circle a box of colors will appear. These are your solid colors.
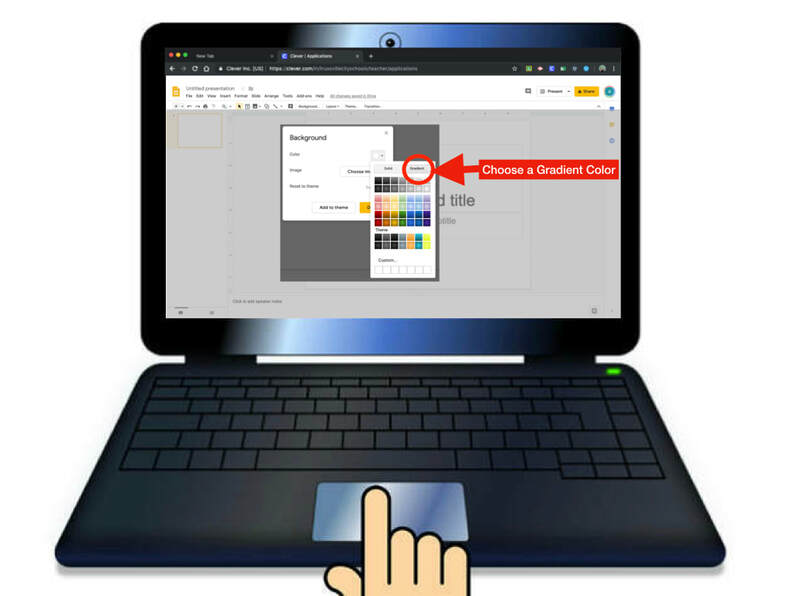
The button beside solid says gradient. Gradient looks realistic. It is not solid color, but shades of color that make the color appear as if a light was shown on the slide.
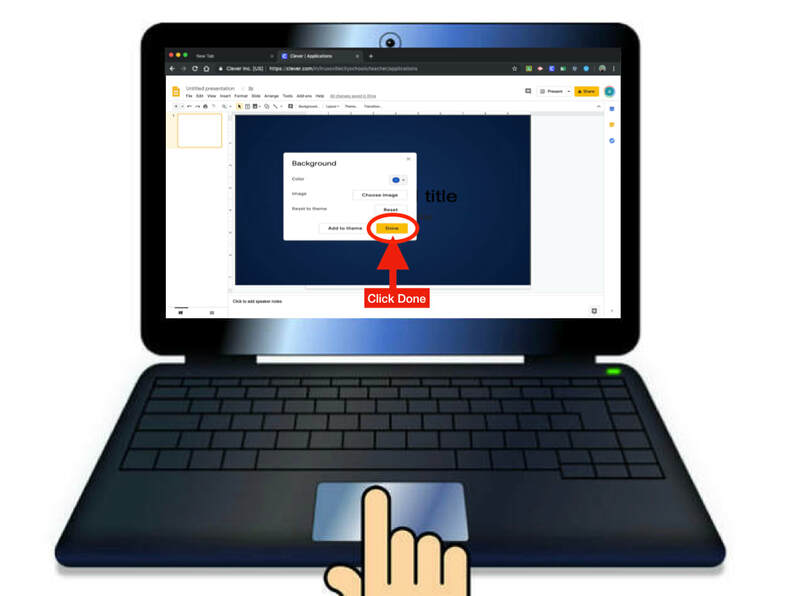
Click on the color you like to select the color. Then click on the yellow button that says, Done.
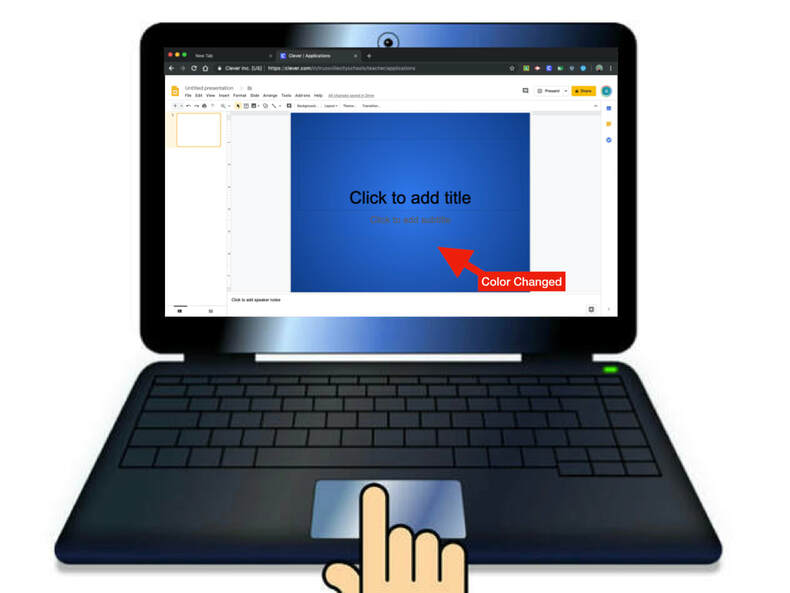
The color of your background changed. If you don't like your color, you can follow the steps again to change it.
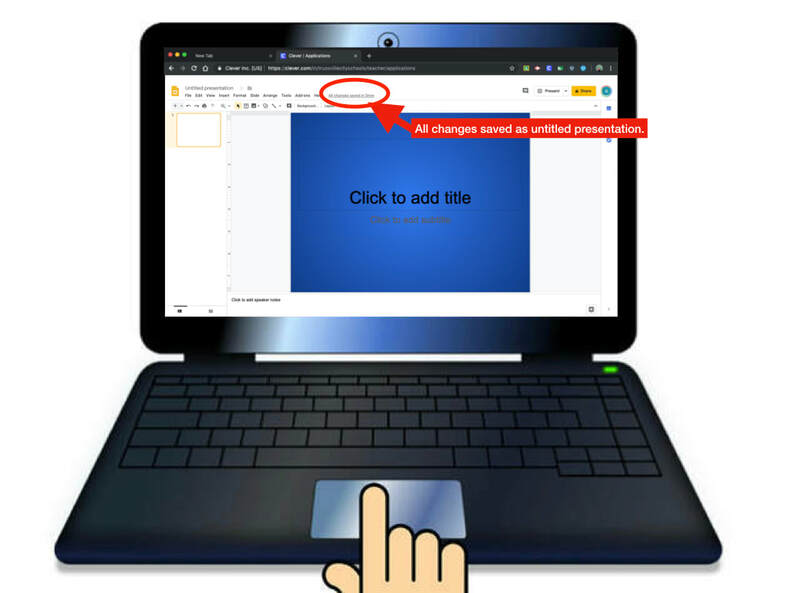
When you use Google Slides, Google saves your work as an "Untitled Document" every minute or so in your Google Drive. Your Google Drive is like your work folder online. All of your work is saved in Google Drive. It also allows you to share work with others.
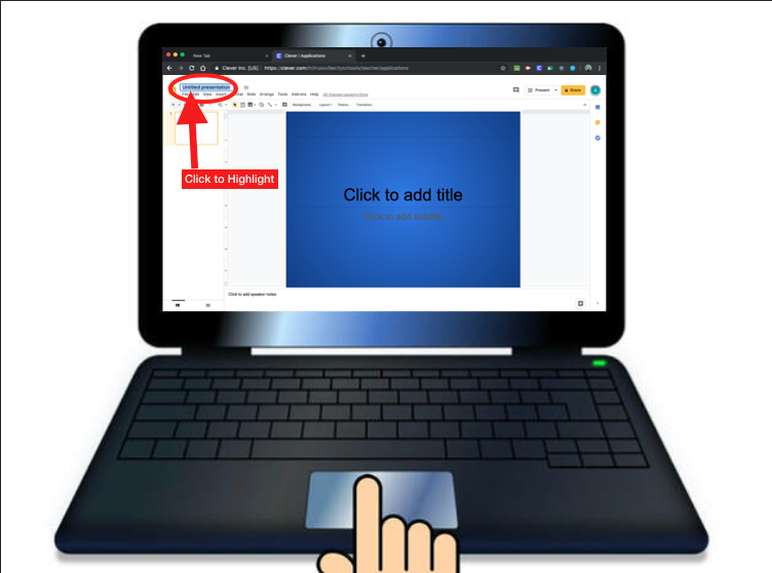
Before you close out of your work, you should always give it a name. Click one time on the box in the top, left corner that says, "Untitled Presentation" to highlight it.
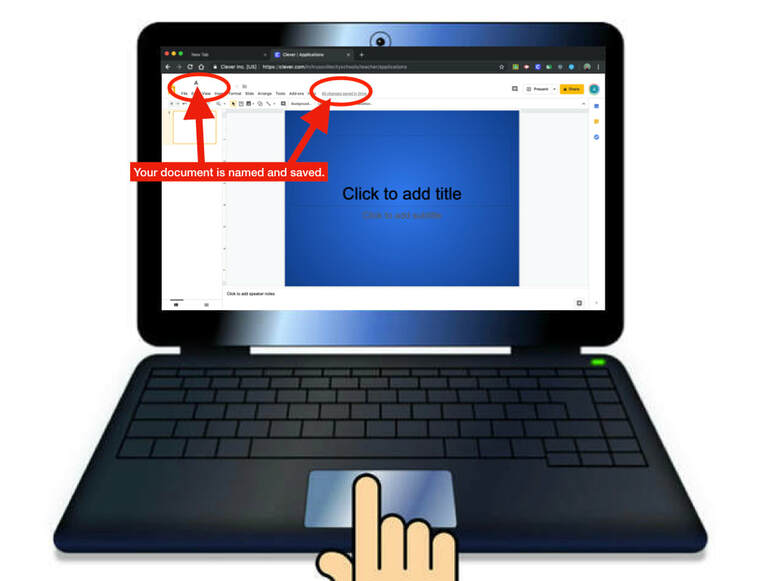
Type your assigned letter for the name. Your letter will appear as the name.

Press Ender on your keyboard. You will see that the document now has a name and is saved in your Google Drive.
DAY 3:
Text Boxes
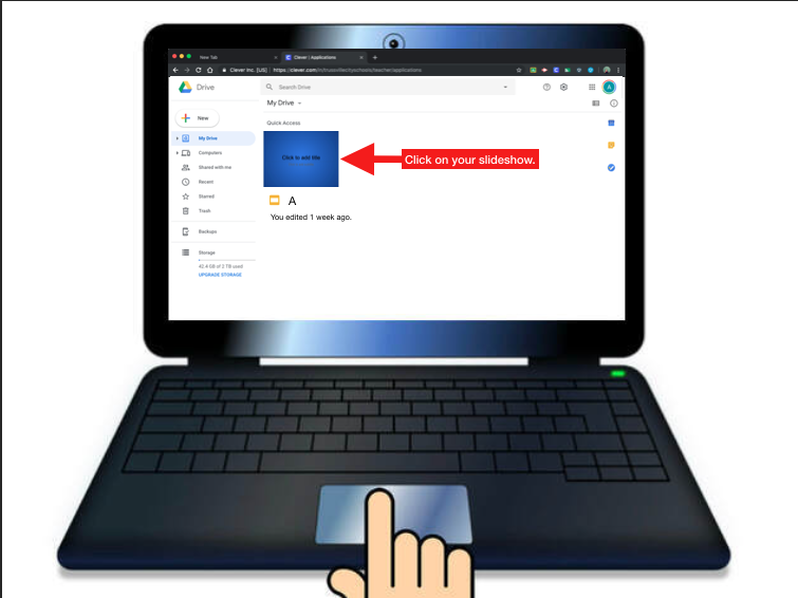
Today, we are going to find your slide in Google Drive. Sign into your computer and go to your clever dashboard. Click on your Google Drive Icon.
You will see your slide saved in your Google Drive. Remember you named it the letter that you were assigned. Click on the picture of your slide.
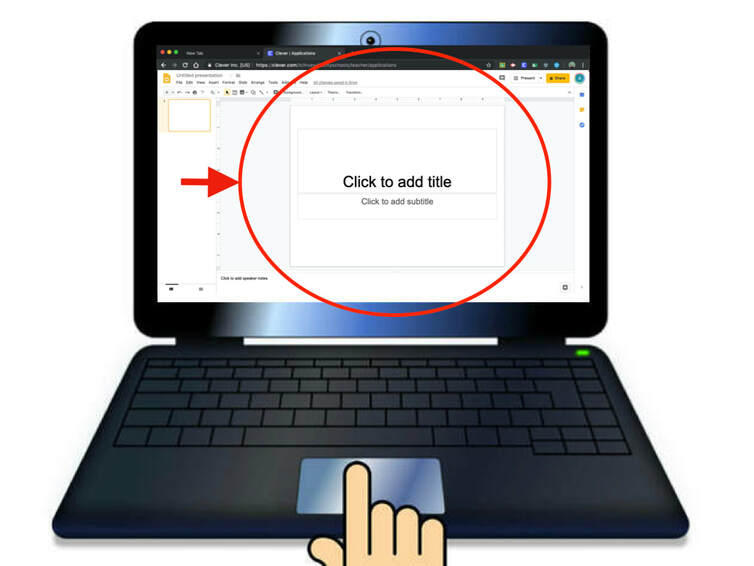
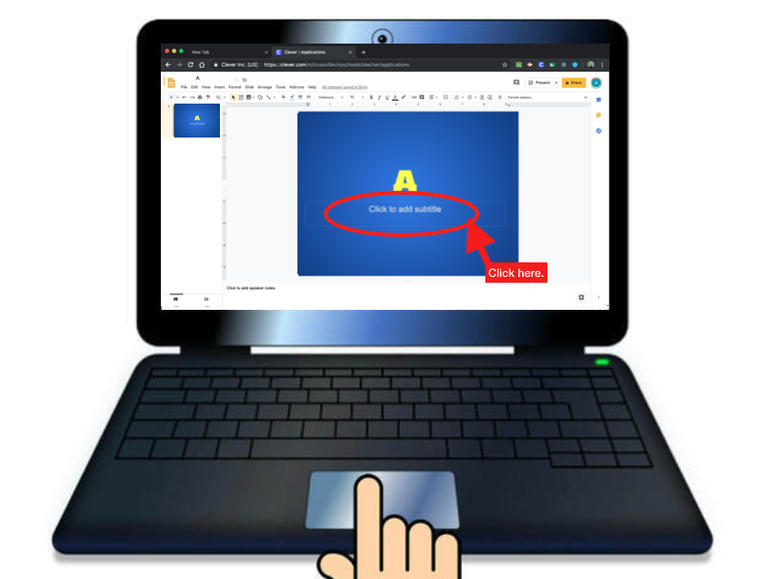
Today we are going to learn about Text boxes. Click in the box that says click to add title.
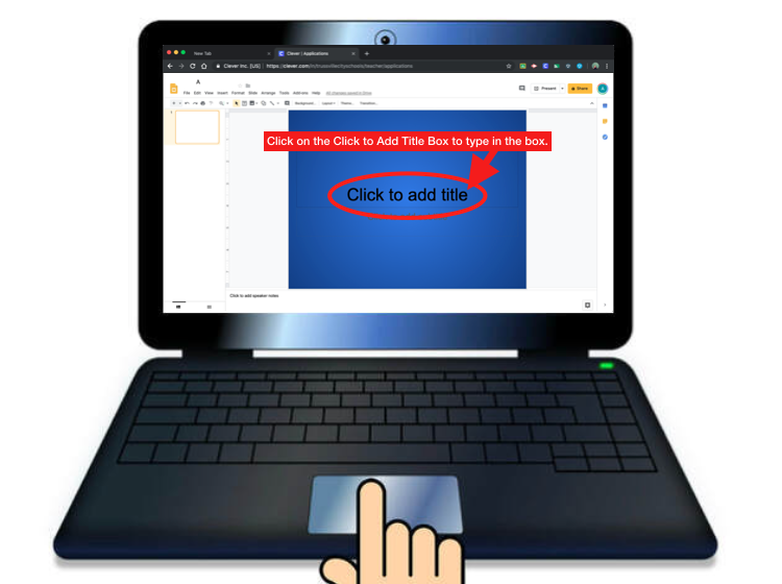
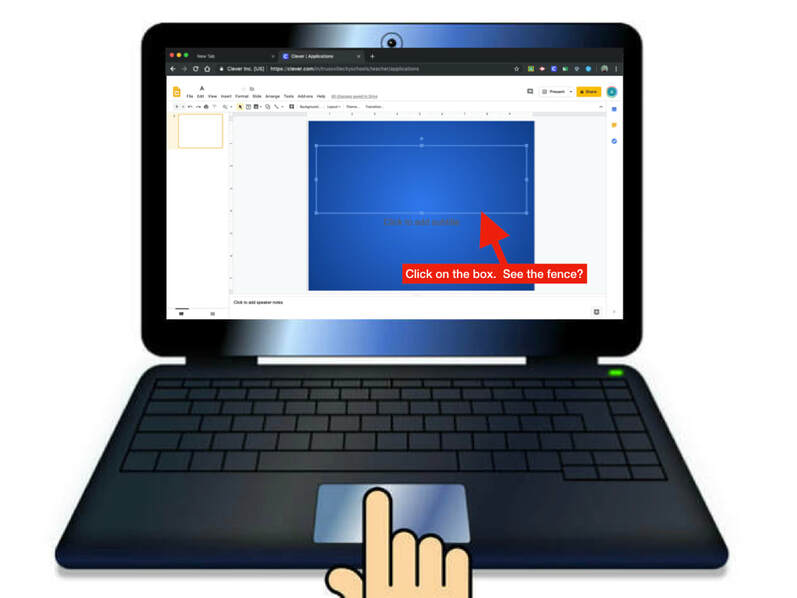
The box becomes empty except for a flashing line in the middle. The flashing line is called a cursor. The cursor shows where you will start typing. A line appears around the text box. We are going to call this box outline a fence. The line has small little squares in the corners of the rectangle box and half way down each line. We are going to call these fence posts.
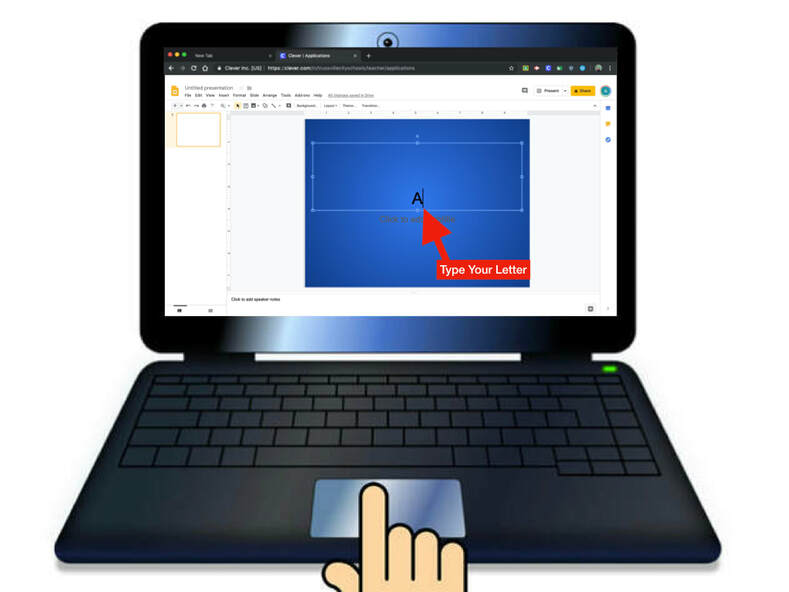
Now, use your time out pointer finger and press the Shift key. Then, type your letter. The shift key made the letter a capital letter.
Use your trackpad and move the arrow on your screen to right before your letter. Click on your trackpad. You will see the cursor appear before the letter.
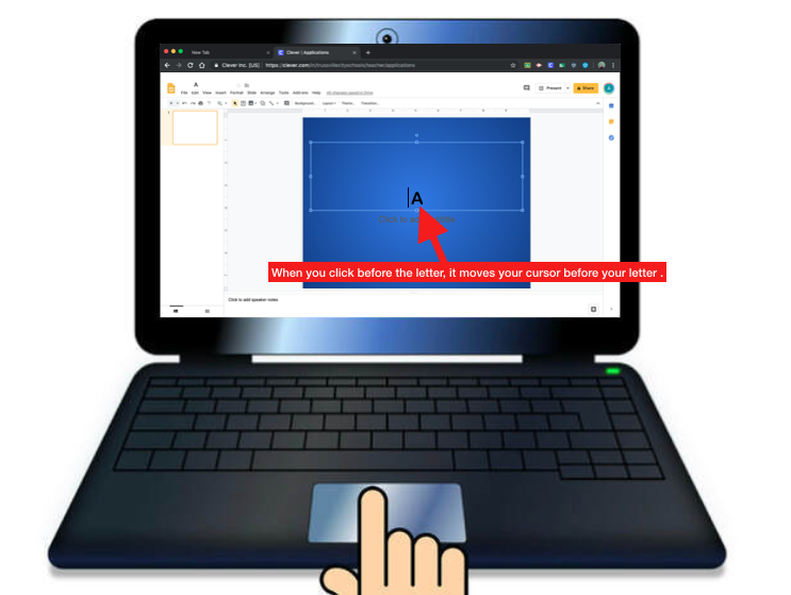
When you put the cursor here, it allows you to easily highlight the letter or word so that you can change things about it.

The circle portion in the tool box is the type of font that your letter will appear. Font is the style that your letters will appear when you type.
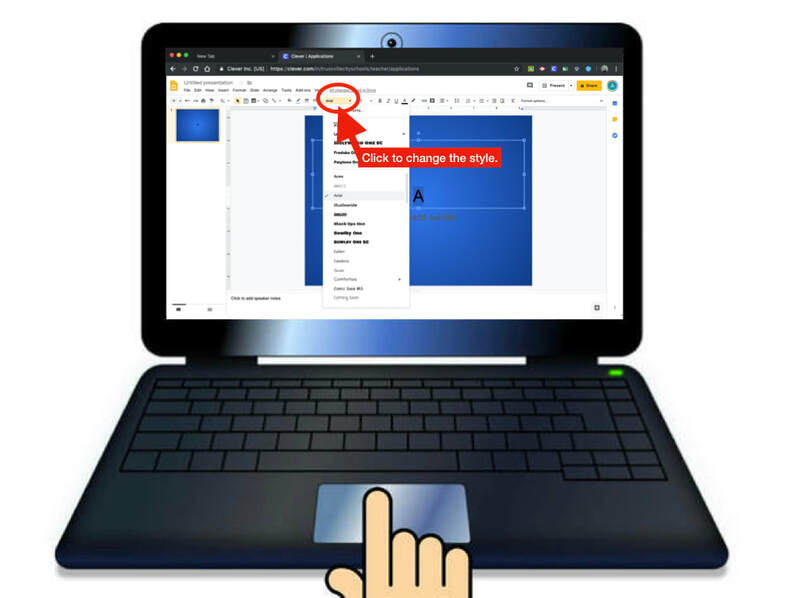
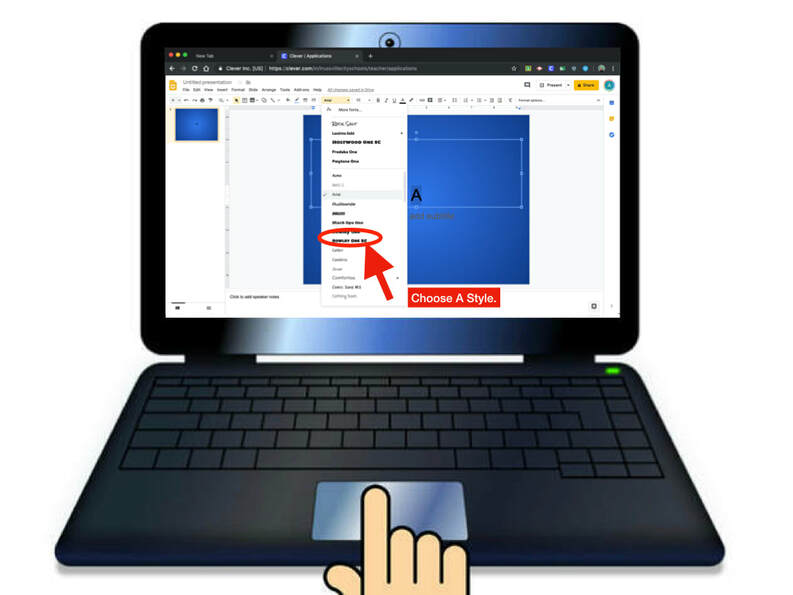
Click on the little "pizza" symbol next to the word. Remember this gives you a drop down menu. Scroll down until you find a font you like. Then click on it.
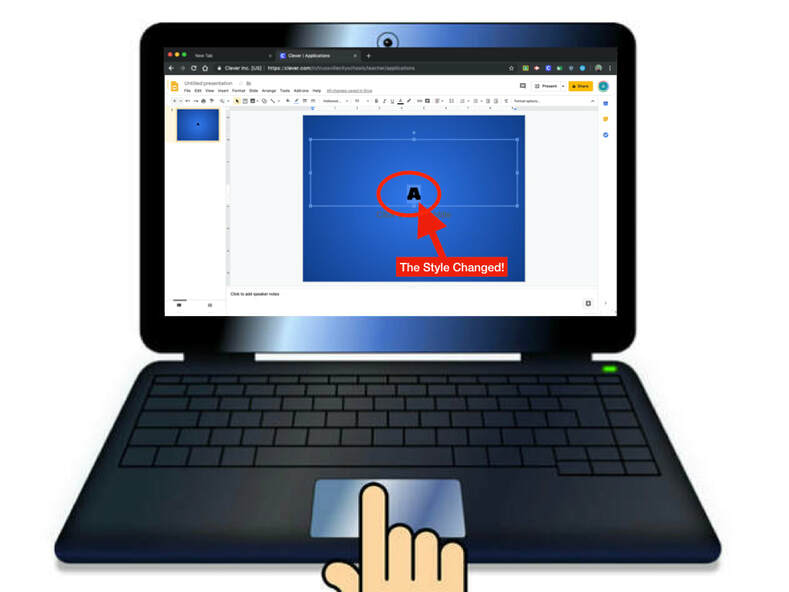
Look, the style of your letter changed to the font you chose. If you don't like this font click on the font style drop down menu again and change it to a different font.
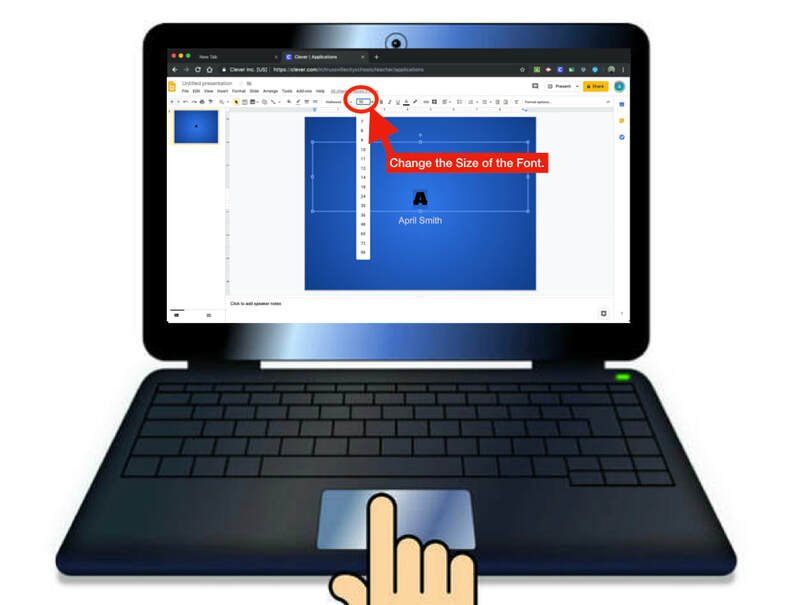
Now, click on the second box to type your name. Do you remember how to capitalize your first letters and how to make a space between your first and last name?
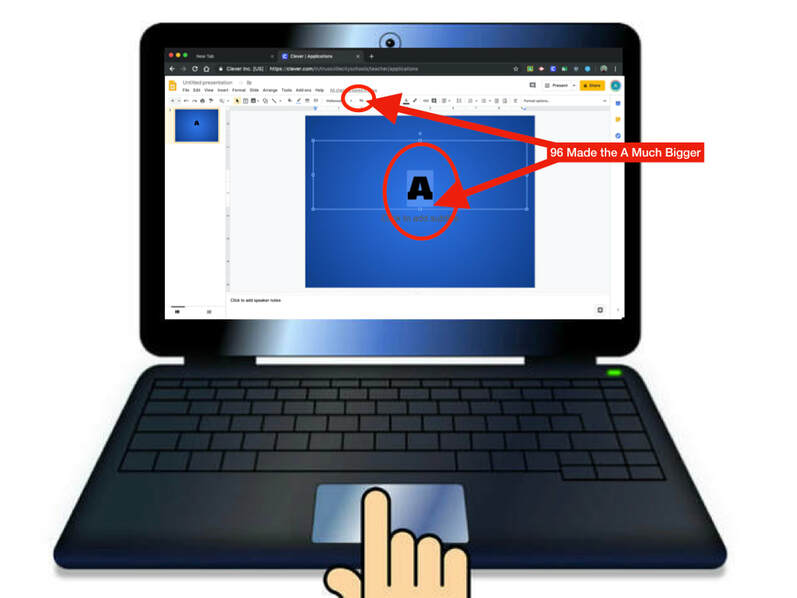
Now, go back to the letter text box. Use your trackpad to move your cursor before your letter and click twice. The number icon below shows the size that your words will be. We want a bigger letter. Click on the pizza beside the number. Choose 96. This will make your font much bigger.
See, the number in the font size box changed to 96 and your letter got bigger.
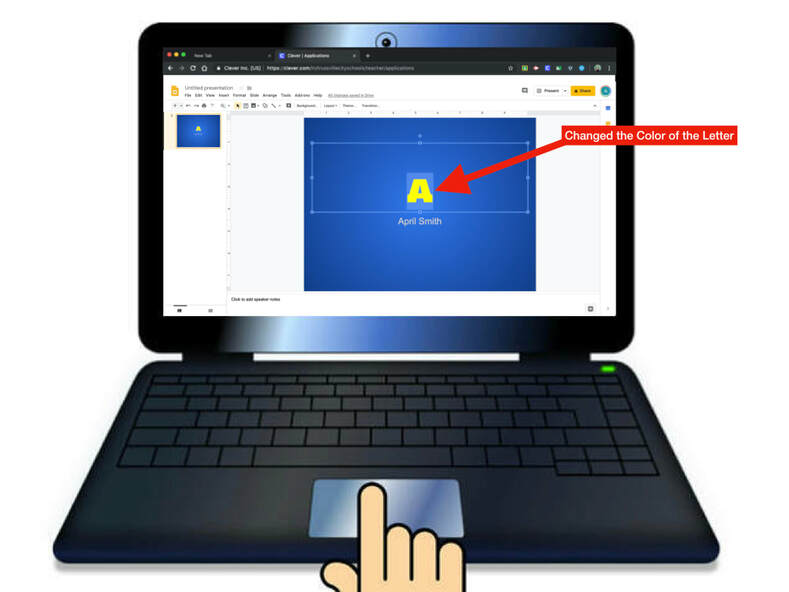
Your letter should still be highlighted but you know what to do if it isn't. Now click on the icon that has an A with a line under it. This is your letter color icon. It will change the color of your letter. Choose a color from the box when it pops up.
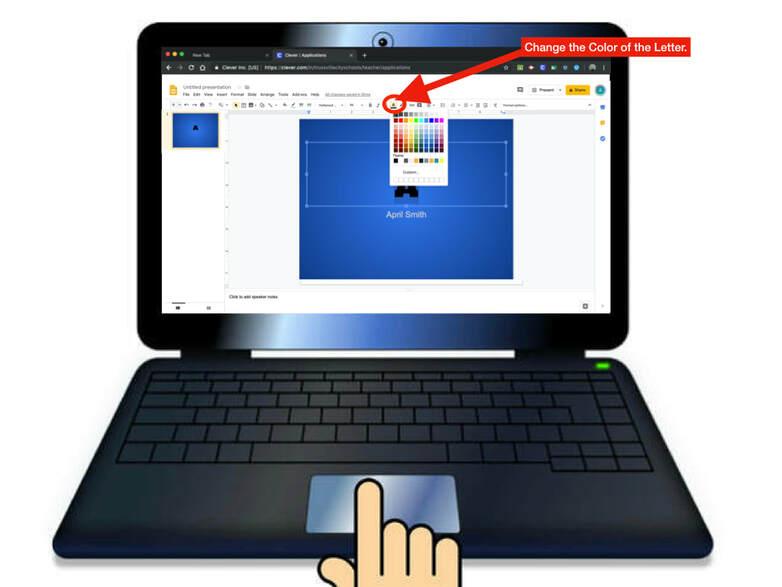
Look, your letter changed colors.
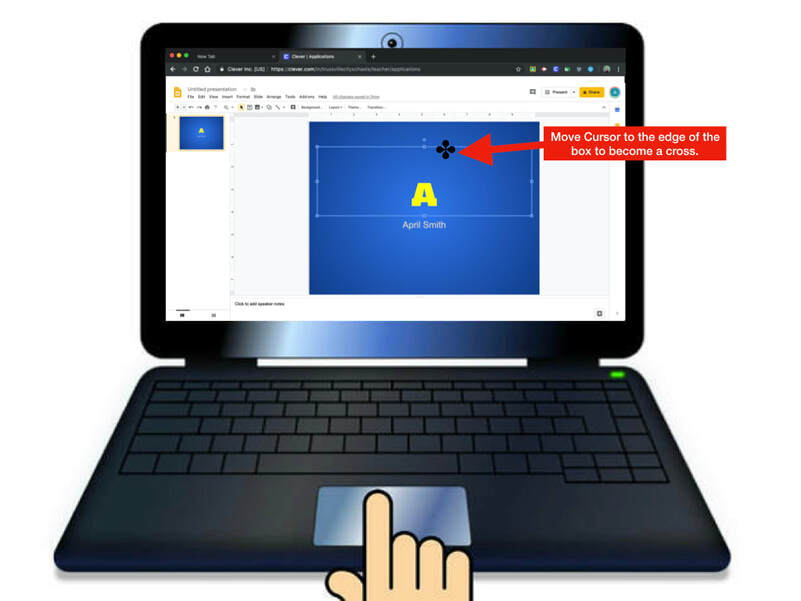
Now, move your cursor to the outline of the fence that surrounds your letter. When your cursor changes from an arrow to a cross click once on your trackpad. This tells the computer to change the text box and not the letter inside.
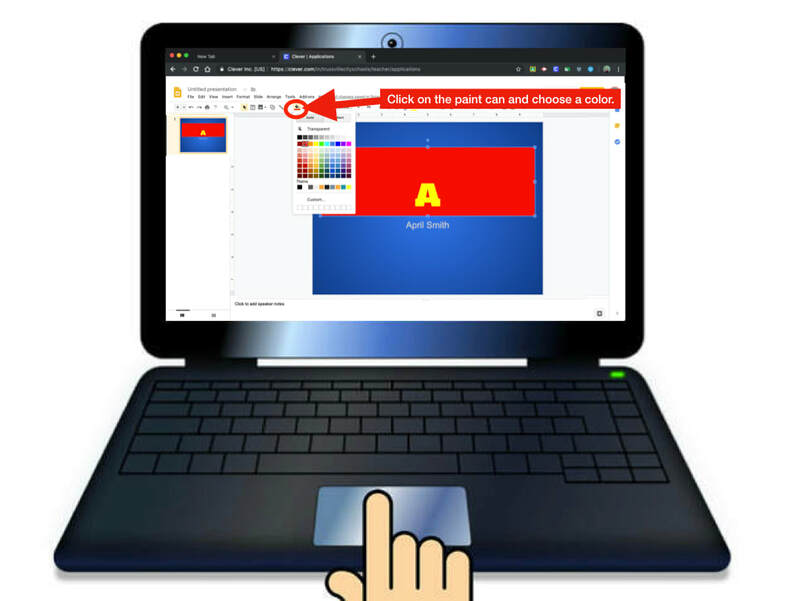
Go to the paint bucket icon in your tool box. This changes the color of your text box background. Choose a color.
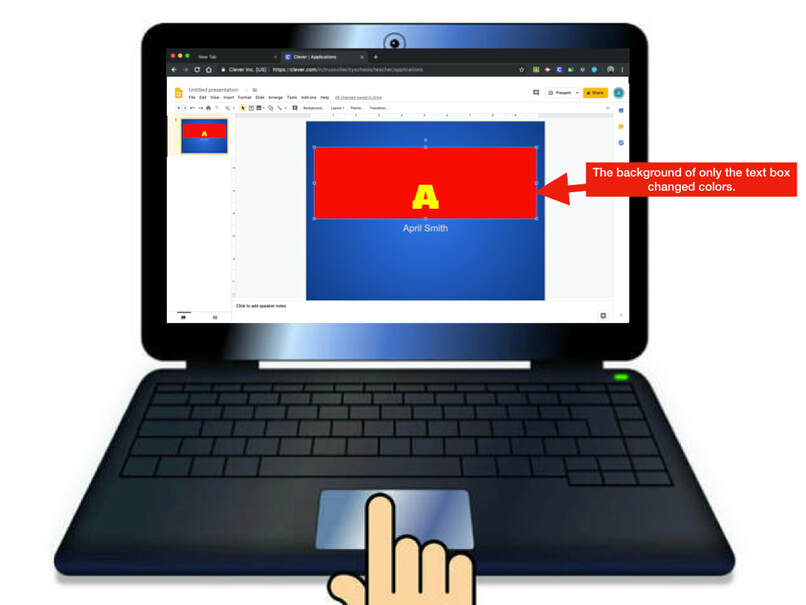
The background changes color. If you don't like the color click on the paint bucket again and choose a new one.
This ends today's lesson on text boxes. Close your Google Drive and sign out of your computer.
DAY 4:
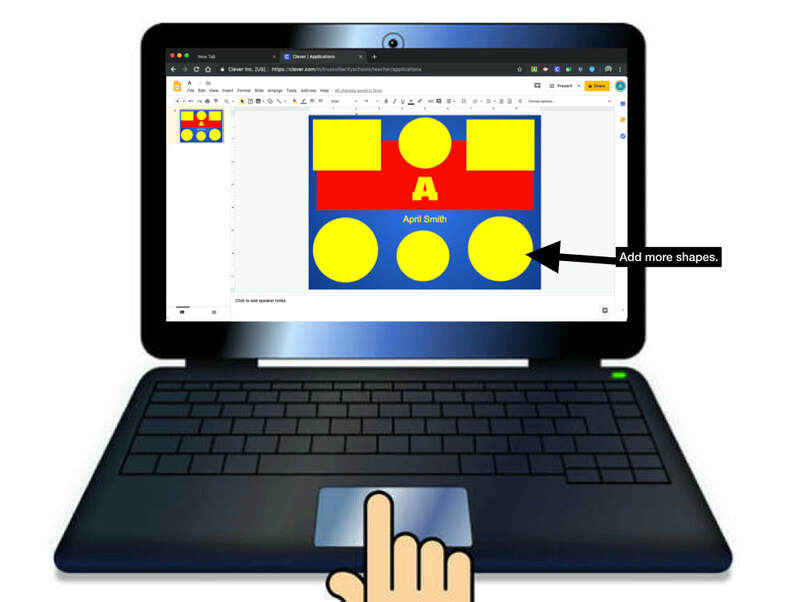
Adding Shapes
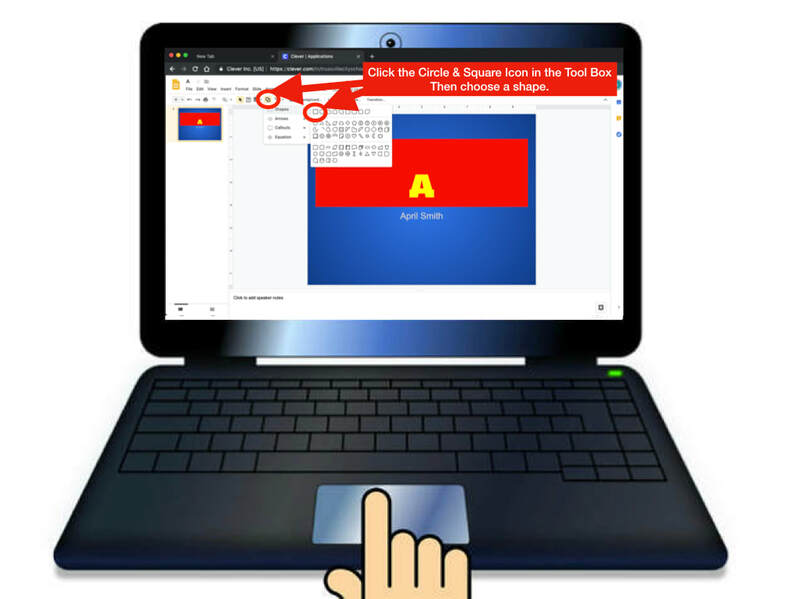
Today you are going to learn to add, change, and move shapes on your Google Slide. Click on the icon with a circle and square. This is your shapes icon. Then choose a shape.
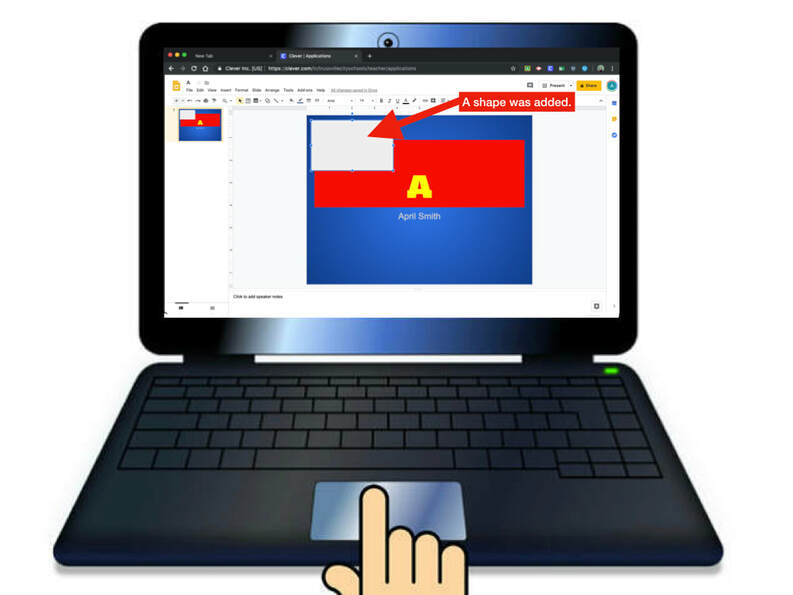
A shape will not appear. Your cursor will turn into a + . Hold down your trackpad and move your finger down and over to draw a shape. When you see the + it means you are in drawing mode.
If you make your shape to large, put your cursor on the bottom, right fence post until you see a double arrow appear.
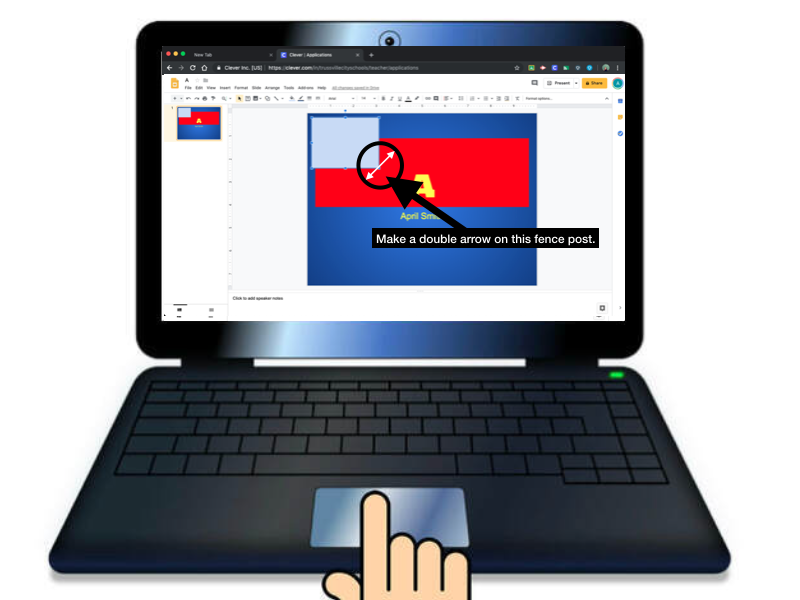
When the cursor turns into a double arrow, use your trackpad to move the fencepost towards the top, left corner. You will see that the shape becomes smaller.

Click on the paint can. Remember, if you do not have a fence around the shape then, you will not see the paint bucket. Choose a color from the drop down menu.
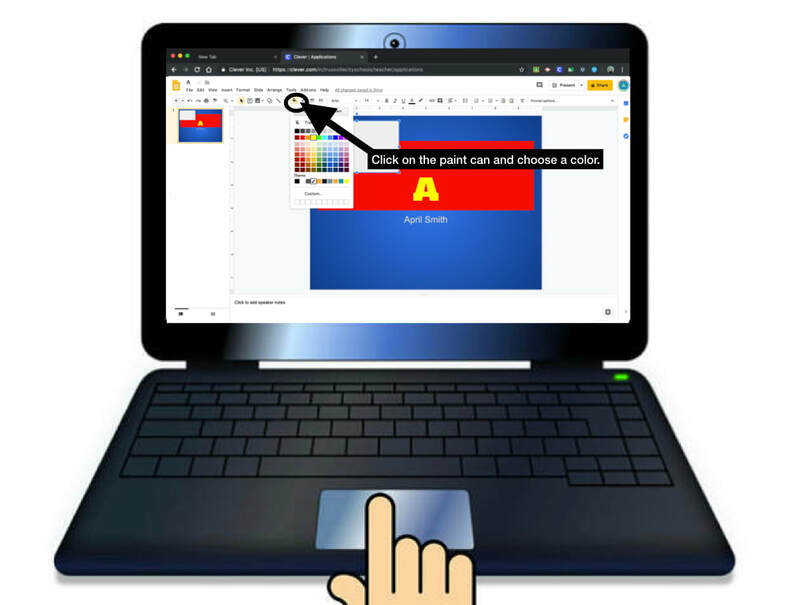
The color of the shape changed. You can drag the shape anywhere you like.

Now, practice drawing more shapes on your slide.
DAY 5:
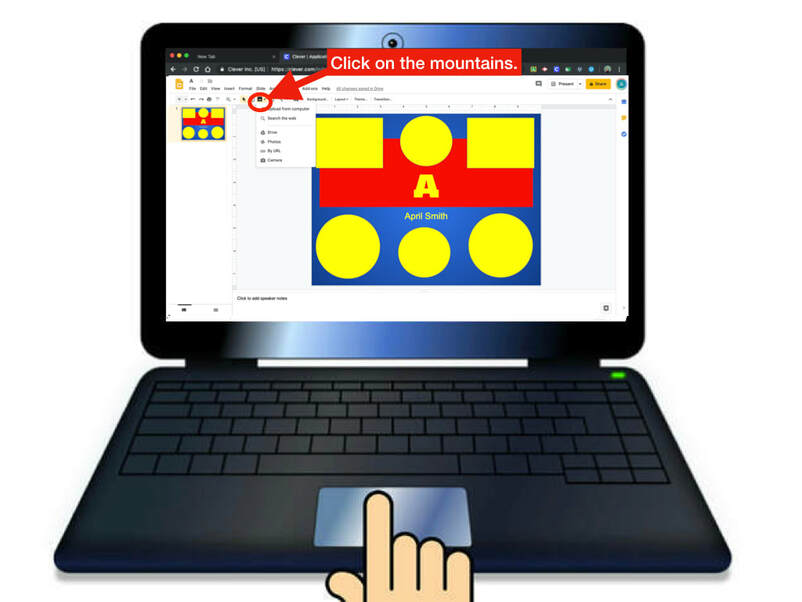
Adding Images
To add images, click on the icon that has two snow tipped mountains.
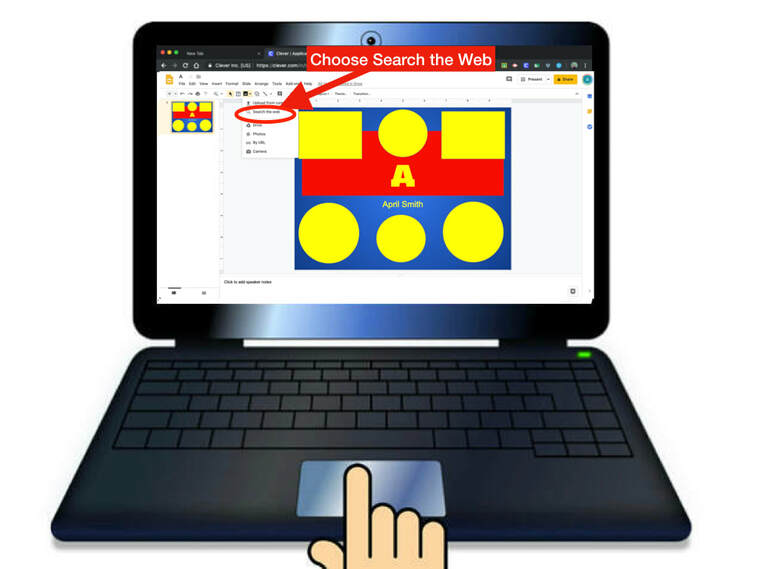
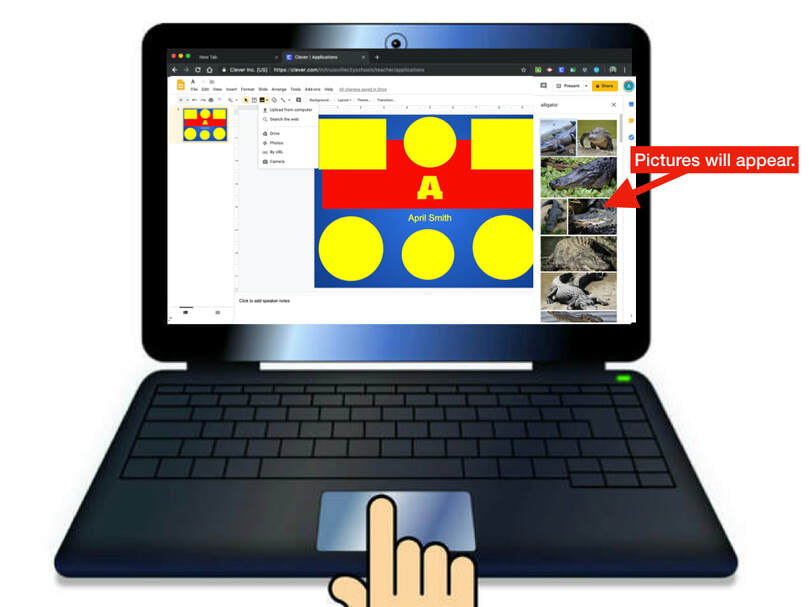
From the drop down menu, click on the magnifying glass that says search the web.
A Google Box will appear on the right side. Click in the search box. Type the word of the image you are looking for.
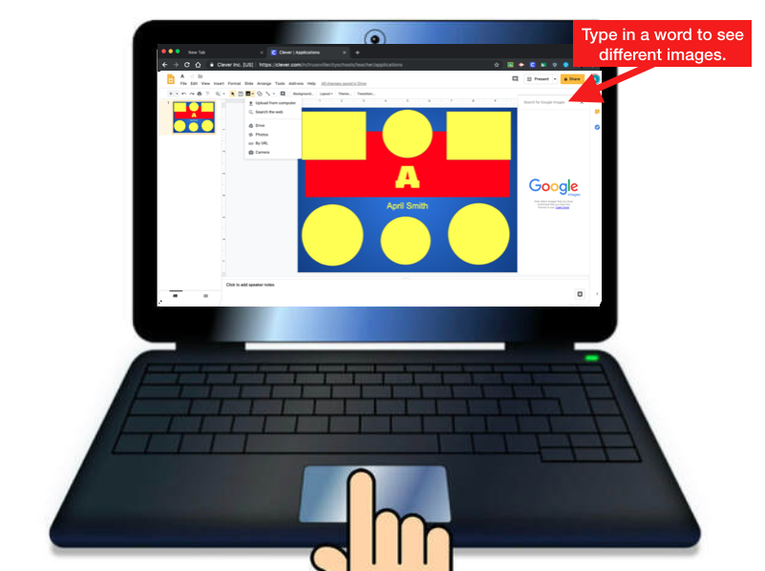
In this example, my letter is A, so I typed in the word alligator. Images of alligators appeared for me to choose from.
When you find one you like, click on it. You will see a blue check mark appear.
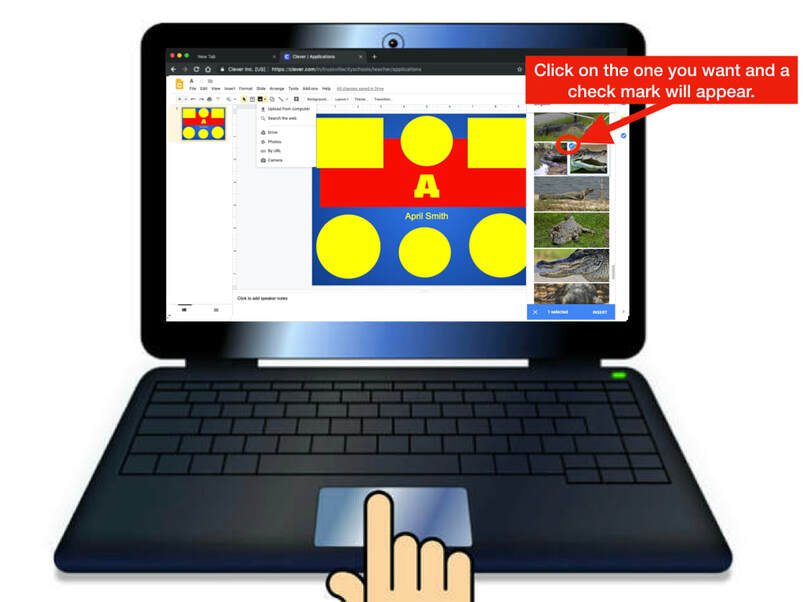
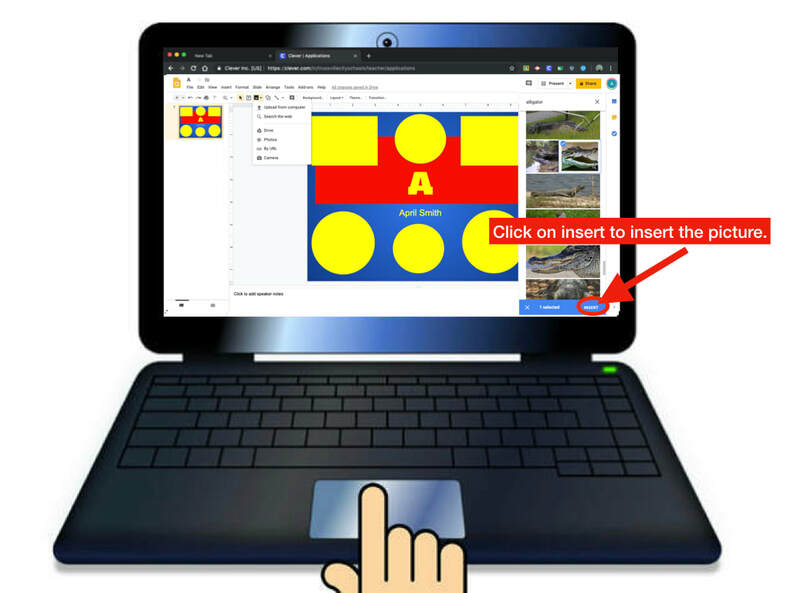
Then, click the insert button on the bottom right to insert the picture.
Your image might be very large and you will want to shrink it down.
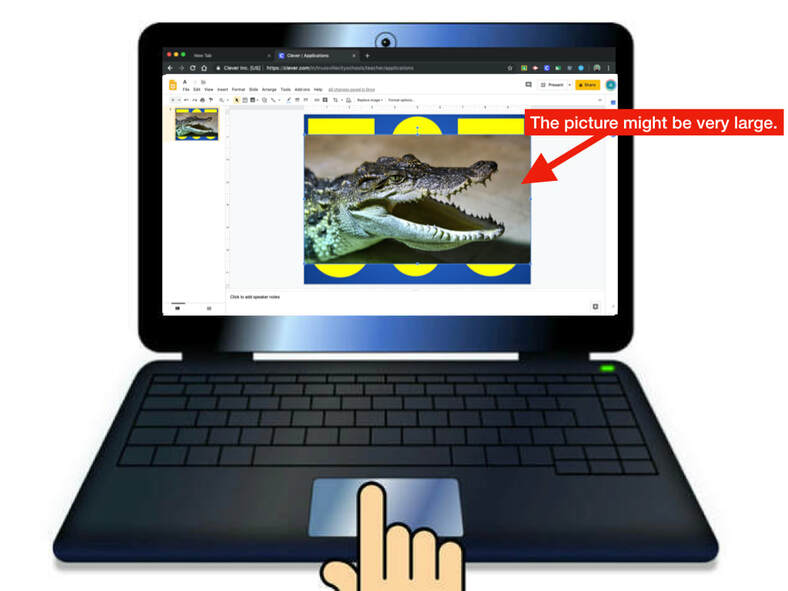
Shrink an image the same way you did with a shape. Put your cursor on the fence post on the bottom right. Move your finger up towards the top right corner of your trackpad until you get it the size you want it. To make it bigger, you will drag the bottom, right fence post toward the bottom right of your screen.
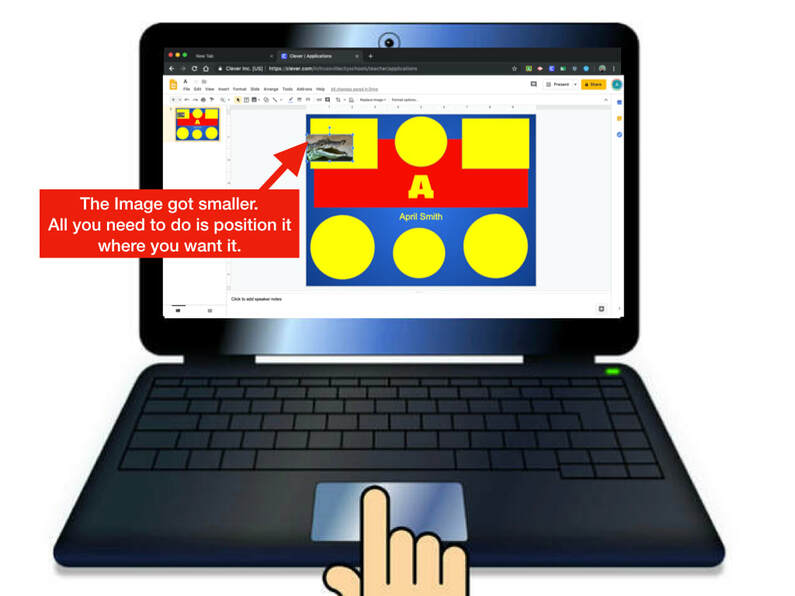
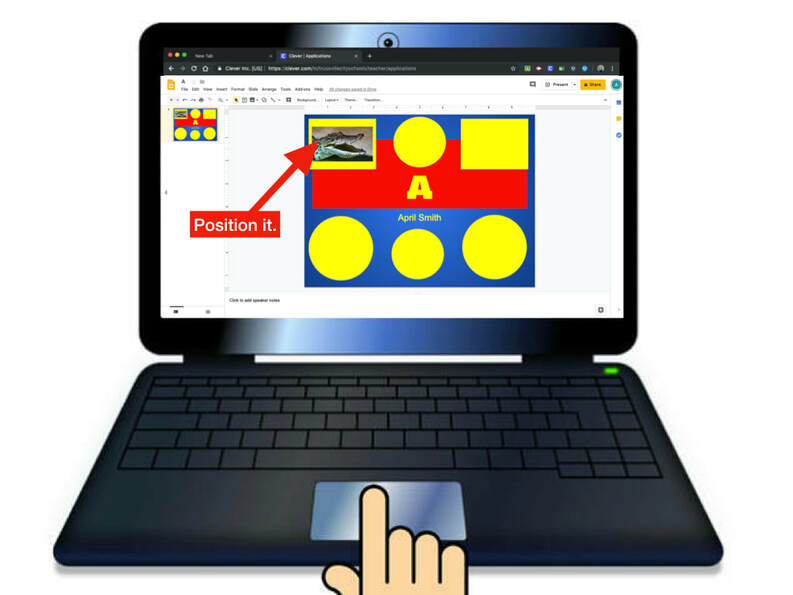
Drag the image where you want it on the slide.
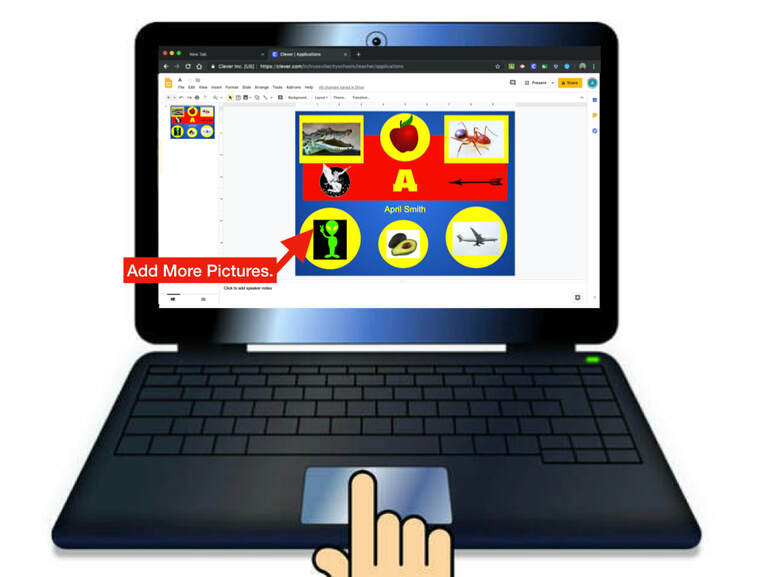
Practice adding and moving more images that have the same first letter as your slide letter.
DAY 6:
Sharing Slides and Making the Book
When you have finished your slide. You will share it with me and I will show you how we will put the slides together to make a book.
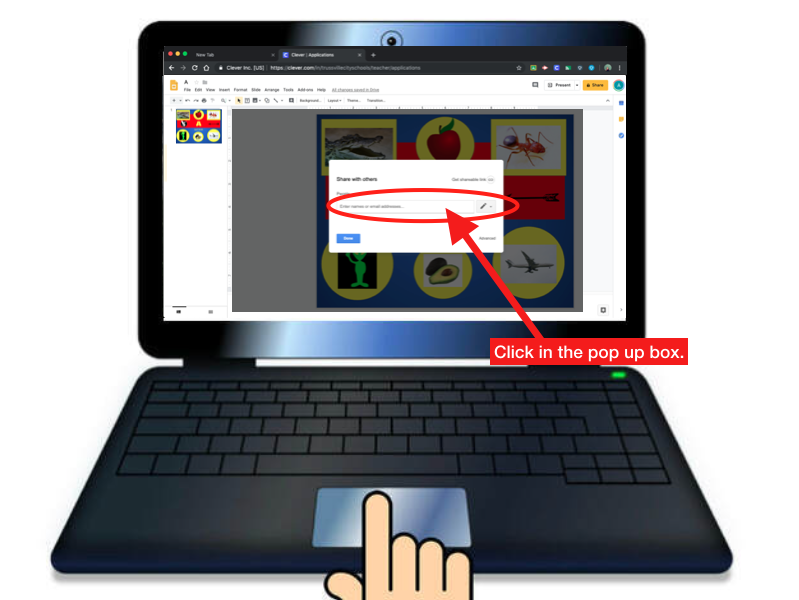
Click on the share button in the upper, right corner of your screen.
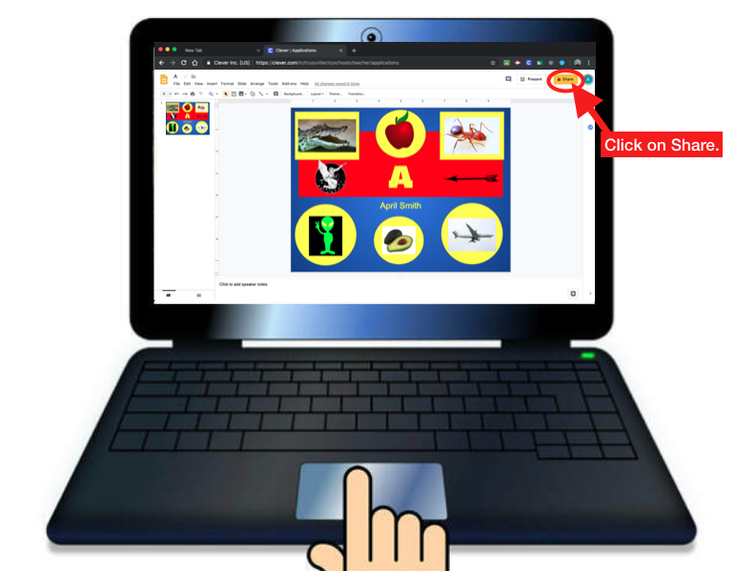
Click inside the pop up box when it appears.
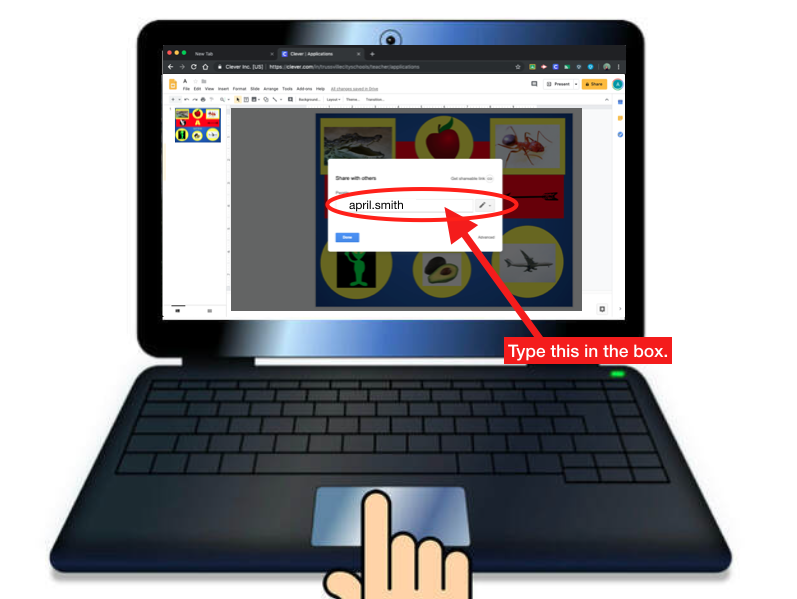
Type in april.smith and a pull down menu will pop up.
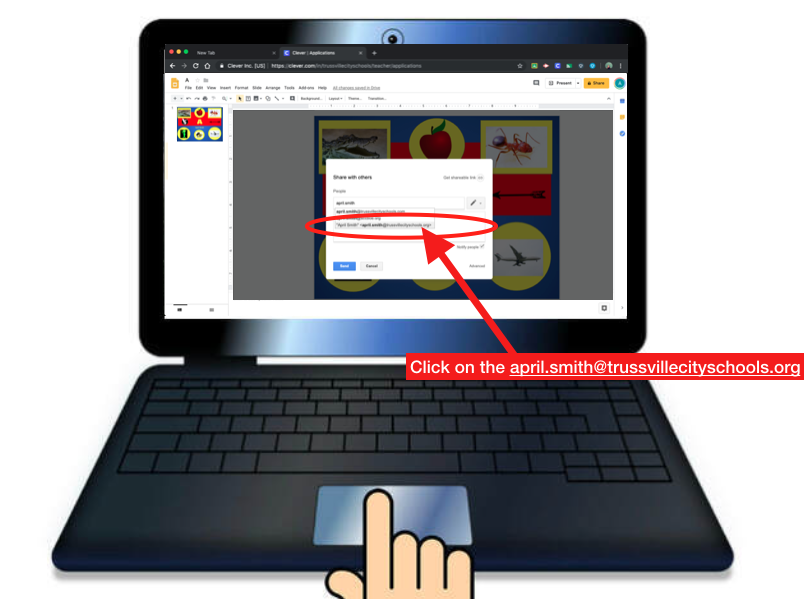
Click on the address with my name that ends in .org.
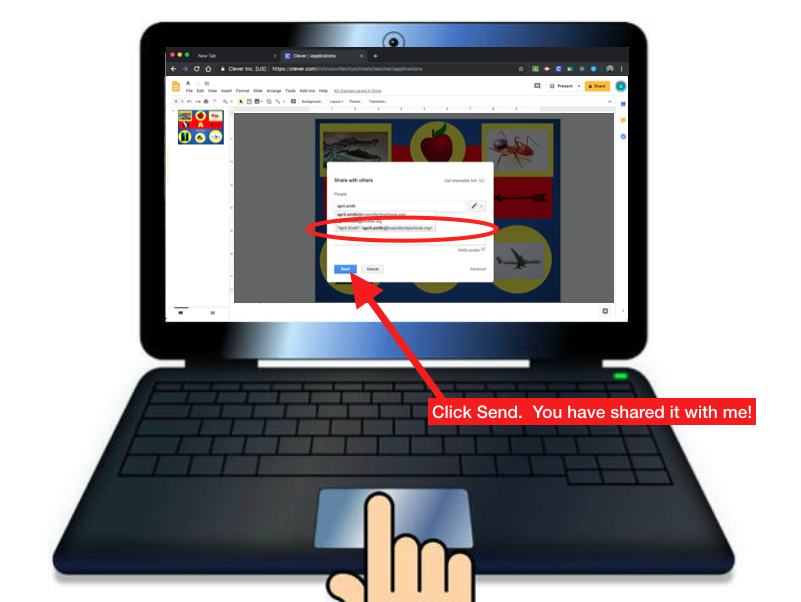
Click send. Congratulations! You have officially shared your first document.
MISSION ACCOMPLISHED

|
CONGRATULATIONS!
You accomplished your mission!
We will present your book to your teacher next week.
|