CODING INNOVATIONS
LESSON 4: PROGRAMMING DEVICES
TODAY'S MISSION

|
|
ACTIVITY 1: WHAT DO YOU KNOW ABOUT IT?
DO THIS ACTIVITY AS SOON AS YOU ARRIVE TO CLASS. DO NOT WAIT FOR OTHERS TO ARRIVE!
|
Click on the Google Classroom Icon to the right to go to our class discussion forum. Answer the Lesson 4 question in the discussion forum. You will have two minutes to answer the question. The question you will answer is below. When you are finished go on and read the directions for Activity 2, but do not start.
Can you name a few devices people use every day that might contain computer chips like the one on the micro:bit?
|
|
ACTIVITY 2: IDENTIFY IT
Go ahead and create a Lesson 4 page in your Innovations Journal. See the example below. As we go through the activities today, make notes of anything you find interesting or things that you learned.
CodeSpace
Read this whole paragraph before taking any action!
The purpose of Activity 2 is to allow you to connect what you know about devices that use microcomputers in the real world to how programs are written that run these devices. After reading these instructions, you will click on the Code Bot Lab icon to the left. This will take you to CodeSpace. When you get there, read the page and then click, Take the Tutorial. Pay attention to all that is shown to you. Please feel free to take notes! Follow the directions and do what it tells you to do in the tour. Do not rush through the tutorial! Take your time. I will give you as much time as you need! When you finish 1.2 First Steps in the CodeSpace Tutorial, you have completed Activity 2. Leave the CodeSpace Tab open. Toggle back here and wait for further instructions. Now, get started!
ACTIVITY 3: EXPLAIN IT
Read this whole paragraph before taking any action!
In Activity 3 you will experience how devices with microchips work using the tools in CodeSpace and the Micro:bit. After reading these instructions, you will toggle back to the CodeSpace Tab. At the bottom of 1.2 First Steps, click next. Read about the micro:bit, the warning about static electricity, and answer the Test Your Knowledge question at the bottom of the 1.4 First Steps Page. Then, go through the exploring your micro:bit tutorials. When you finish 1.6 First Steps in CodeSpace, you have completed Activity 3. Leave the CodeSpace Tab open. Toggle back here and wait for further instructions. Now, go learn about that micro:bit!
In Activity 3 you will experience how devices with microchips work using the tools in CodeSpace and the Micro:bit. After reading these instructions, you will toggle back to the CodeSpace Tab. At the bottom of 1.2 First Steps, click next. Read about the micro:bit, the warning about static electricity, and answer the Test Your Knowledge question at the bottom of the 1.4 First Steps Page. Then, go through the exploring your micro:bit tutorials. When you finish 1.6 First Steps in CodeSpace, you have completed Activity 3. Leave the CodeSpace Tab open. Toggle back here and wait for further instructions. Now, go learn about that micro:bit!
ACTIVITY 4: APPLY IT
Read this whole paragraph before taking any action!
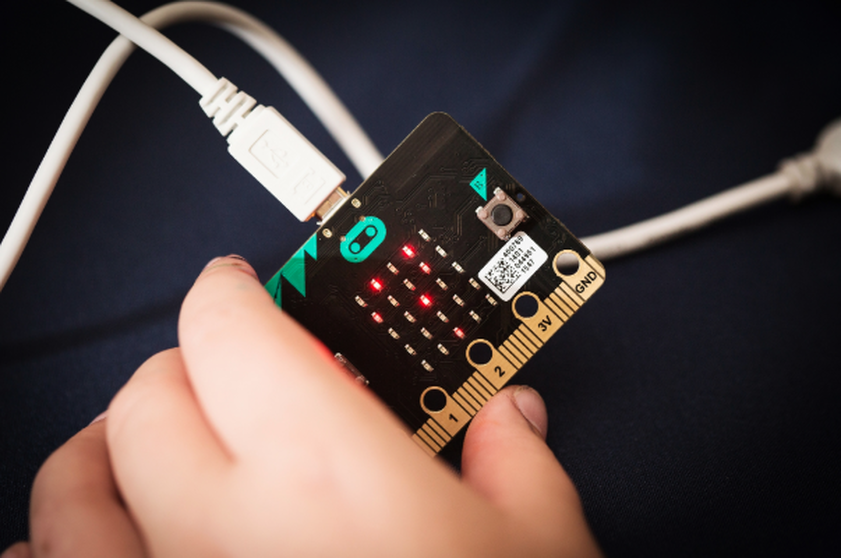
For Activity 4, you will apply what you know about the way devices with microchips work and what you have learned in CodeSpace using the Micro:bit to write your first program for the micro:bit. After reading these instructions, you will toggle back to the CodeSpace Tab. At the bottom of 1.6 First Steps, click next. Connect the small end of the USB Wire to the Micro:bit and the large end to the USB Port of your Chromebook. Read and follow the instructions. In 1.9 First Steps, you are going to name your first file and experience how all your files are saved to your school Google Drive. In 1.10 First Steps, you will learn to write code for the micro:bit's LED Light display. When you get a heart in the display, raise your hand so the teachers can check off that you learned how to do this. When you finish 1.10 First Steps in CodeSpace, you have completed Activity 4. Leave the CodeSpace Tab open. Toggle back here and wait for further instructions. Now, go forth and become coding legends!
For Activity 4, you will apply what you know about the way devices with microchips work and what you have learned in CodeSpace using the Micro:bit to write your first program for the micro:bit. After reading these instructions, you will toggle back to the CodeSpace Tab. At the bottom of 1.6 First Steps, click next. Connect the small end of the USB Wire to the Micro:bit and the large end to the USB Port of your Chromebook. Read and follow the instructions. In 1.9 First Steps, you are going to name your first file and experience how all your files are saved to your school Google Drive. In 1.10 First Steps, you will learn to write code for the micro:bit's LED Light display. When you get a heart in the display, raise your hand so the teachers can check off that you learned how to do this. When you finish 1.10 First Steps in CodeSpace, you have completed Activity 4. Leave the CodeSpace Tab open. Toggle back here and wait for further instructions. Now, go forth and become coding legends!
ACTIVITY 5: ANALYZE IT
Read this whole paragraph before taking any action!
In Activity 5, you will analyze how code is constructed to make the LED Display show different images by writing code for different images on your own. Remember, it is very, very important to read all directions and to use the proper capitalization and punctuation. After reading these instructions, you will toggle back to the CodeSpace Tab. At the bottom of 1.10 First Steps, click next. Click on the images link in 1.11 First Steps, you import the code for other images. Read and follow the instructions to create the Quavers image. The create files for three programs of your choice. Write the program for each image you choose. Raise your hand after you successfully complete a program for each image. You will know you are successful when the image appears in the micro:bit and you have no error messages in your code. When you finish 1.12 First Steps in CodeSpace, you have completed Activity 5. Close the CodeSpace Tab. Go on to Activity 6 on your own.
In Activity 5, you will analyze how code is constructed to make the LED Display show different images by writing code for different images on your own. Remember, it is very, very important to read all directions and to use the proper capitalization and punctuation. After reading these instructions, you will toggle back to the CodeSpace Tab. At the bottom of 1.10 First Steps, click next. Click on the images link in 1.11 First Steps, you import the code for other images. Read and follow the instructions to create the Quavers image. The create files for three programs of your choice. Write the program for each image you choose. Raise your hand after you successfully complete a program for each image. You will know you are successful when the image appears in the micro:bit and you have no error messages in your code. When you finish 1.12 First Steps in CodeSpace, you have completed Activity 5. Close the CodeSpace Tab. Go on to Activity 6 on your own.
ACTIVITY 6: YOU DID IT!
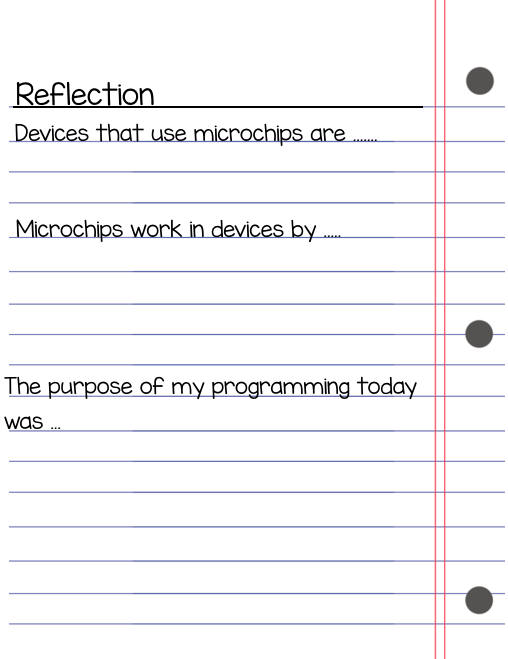
Let's think about all that you have learned today. Answer the following questions in your Innovations Journals. If you do not finish this, you may type it in a Google Doc tonight and share it with me. I will print it out for you to paste in your journal.
- What items use microchips and how to microchips work in devices?
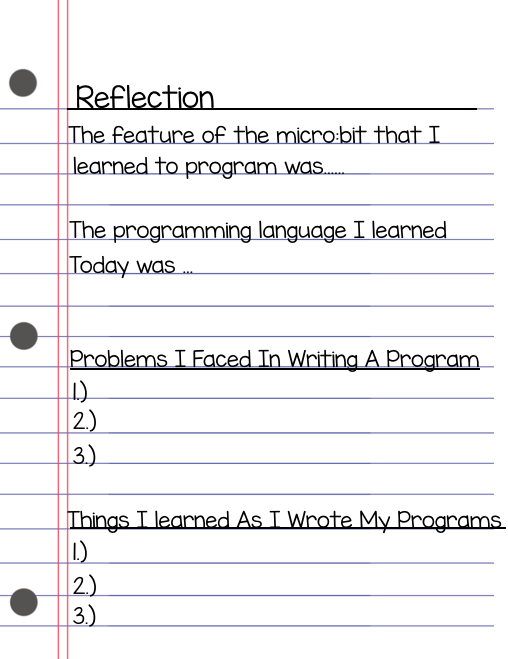
- What was the purpose of your programming today? What feature of the micro:bit did you learn to program.
- What kind of programming language did you learn today and what were some of the problems you faced or things you learned as you wrote your programs.
|
|
MISSION ACCOMPLISHED

|
|